今日から、日々の開発日誌を記述していきたいと思います。皆さんの参考になれば幸いです。
目次
初期設定
STEP
使用パッケージの選択
今回は、下記のパッケージを使用します。
- flutter_hooks:一つのWidget内でStateを管理するのに便利
- hooks_riverpod:hooksとRiverPodの両方を使用できる
- dio:http通信を行うためのパッケージ(httpパッケージよりも便利?)
- go_router:ルーティングを管理するパッケージ
- freezed:イミュータブルなモデルクラスを管理するパッケージ
- json_serializable:jsonを変換するためのパッケージ
- flutter_state_notifier:状態管理のためのパッケージ(RiverPodで使用)
- build_runner:コード自動生成のためのパッケージ(dev_dependenciesにインストール)
- freezed_annotation:freezedを使用するためのパッケージ
STEP
使用パッケージのインストール
下記コマンドをひとつずつ実行して、パッケージをインストールします。
下記コマンドを一つずつ実行してください。
flutter pub add flutter_hooks
flutter pub add hooks_riverpod
flutter pub add dio
flutter pub add go_router
flutter pub add freezed
flutter pub add json_serializable
flutter pub add flutter_state_notifier

flutter pub add --dev build_runner
flutter pub add --dev freezed_annotationパッケージのインストールや使用方法の詳細は、「Flutterのパッケージ使用方法」を参照してください。
STEP
ディレクトリの作成
下記のようなディレクトリをlibディレクトリの直下に作成します。
- models:モデル用のディレクトリ
- providers:Provider保存用のディレクトリ
- views:画面表示UI用のディレクトリ
STEP
main.dartの修正
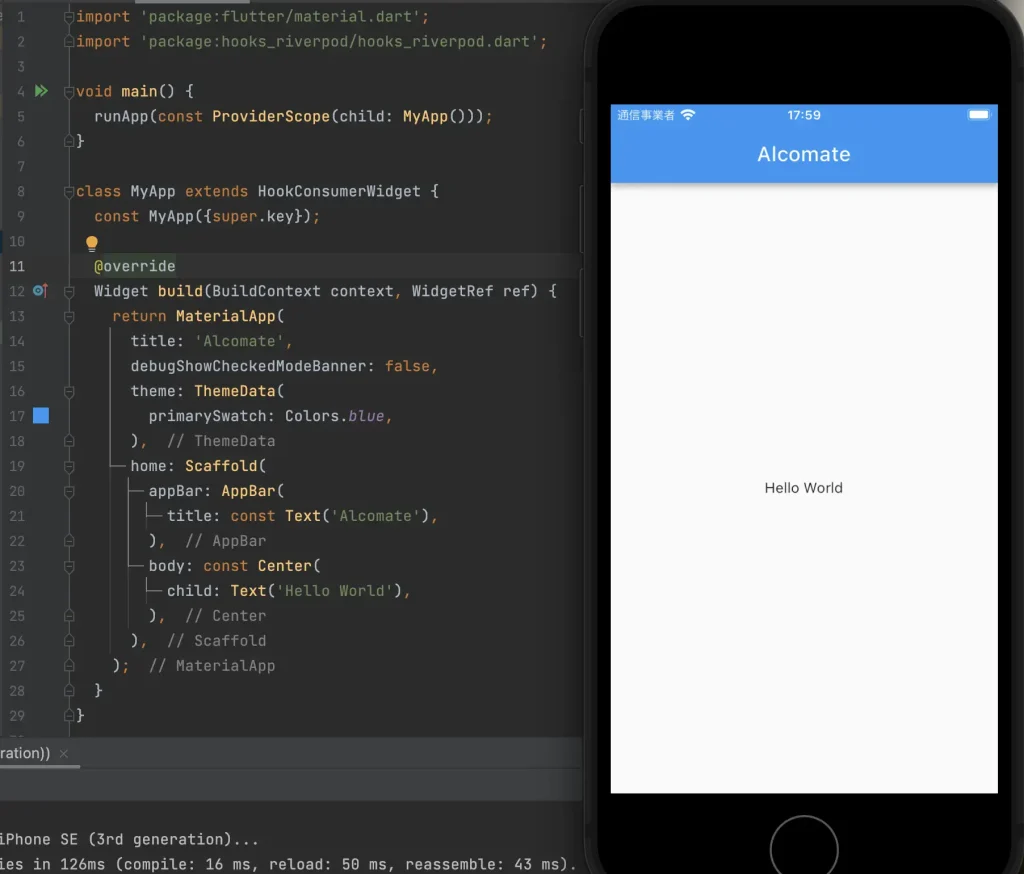
main.dartをRiverpodを使えるように下記のように修正し、とりあえず、Hello Worldを表示します。
app/main.dart
import 'package:flutter/material.dart';
import 'package:hooks_riverpod/hooks_riverpod.dart';

void main() {
  runApp(const ProviderScope(child: MyApp()));
}

class MyApp extends HookConsumerWidget {
  const MyApp({super.key});

  @override
  Widget build(BuildContext context, WidgetRef ref) {
    return MaterialApp(
      title: 'Alcomate',
      debugShowCheckedModeBanner: false,
      theme: ThemeData(
        primarySwatch: Colors.blue,
      ),
      home: Scaffold(
        appBar: AppBar(
          title: const Text('Alcomate'),
        ),
        body: const Center(
          child: Text('Hello World'),
        ),
      ),
    );
  }
}
main.phpの解説
- 4〜6行目:これは、Flutterアプリケーションのエントリーポイントです。
- runApp関数は、アプリケーションのルートウィジェットを定義します。
- ProviderScopeはhooks_riverpodパッケージの一部で、アプリケーションのトップレベルに配置されます。これにより、アプリ全体でRiverpodのプロバイダを利用できます。
- MyAppクラスは、アプリケーションのメインウィジェットです。
- 8〜29行目:MyAppはHookConsumerWidgetを継承しており、これによりRiverPodの状態管理とHooksの機能を利用できます。
- 13〜27行目:MaterialAppはマテリアルデザインアプリのルートウィジェットです。
- titleはアプリケーションのタイトルを設定します。
- 15行目:デバッグバナーを非表示にします。
- 16〜18行目:themeでアプリの基本テーマを設定します。ここでは、プライマリカラーにブルーを使用しています。
- 19〜26行目:homeプロパティは、アプリのホームスクリーンを定義します。
- Scaffoldはマテリアルデザインのレイアウト構造を提供します。
- appBarにはアプリバー(ヘッダー部分)が含まれ、アプリのタイトルが表示されます。
- bodyはアプリのメインコンテンツを含みます。ここでは、Center ウィジェットを使用して中央に Text ウィジェットを配置しています。これにより画面中央に「Hello World」というテキストが表示されます。
STEP
assetsの設定
ルートにassetsディレクトリを作成し、その中のimagesディレクトリを作成します。
pubspec.yamlに作成したディレクトリを登録します。
flutter:
  assets:
    - assets/images/
STEP
ロゴ画像の保存と表示
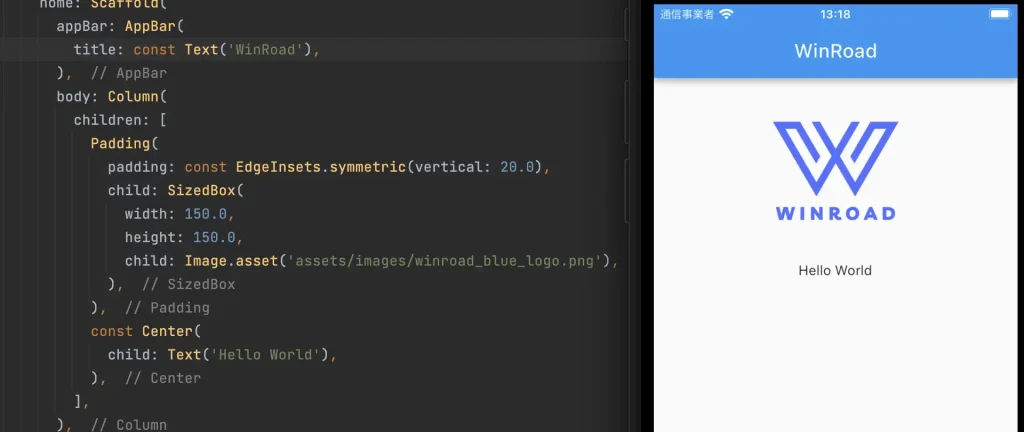
上記で作成したimagesディレクトリにロゴ画像を保存します。
下記コードでロゴを表示します。
Padding(
  padding: const EdgeInsets.symmetric(vertical: 20.0),
  child: SizedBox(
    width: 150.0,
    height: 150.0,
    child: Image.asset('assets/images/winroad_blue_logo.png'),
  ),
),
ログインUIの作成
次に、ログイン用のUIを作成します。
STEP
TextFieldの追加
TextFieldを2つ並べます。
lib/views/login_page.dart
// 省略
Column(
  children: [
    TextField(
      decoration: InputDecoration(
        labelText: 'Email',
      ),
    ),
    TextField(
      decoration: InputDecoration(
          labelText: 'Password',
      ),
      obscureText: true,
    ),
  ],
),
// 省略
STEP
Elevatedボタンの追加
データ送信用のElevatedButtonをTextFieldの下に追加します。
// 省略
ElevatedButton(
  child: Text('Login'),
  onPressed: () {
    // ボタンタップ時の処理
  },
),
// 省略
STEP
Formウィジェットでラッピング
上記のTextFieldとElevatedButtonをFormウィジェットでラッピングします。
// 省略
final _formKey = GlobalKey<FormState>();
// 省略
Form(
  key: _formKey,
  child: Column(
    children: [
      TextField(
       // 省略
      ),
      TextField(
       // 省略
      ),
      ElevatedButton(
       // 省略
      ),
    ],
  ),
),
// 省略- FormStateのグローバルキー _formKey を定義
- Formのkeyプロパティに _formKey を設定
このように設定することで、後から _formKey.currentState などでForm全体にアクセスできるようになります。
バリデーション成功可否のチェックやonSavedメソッドの実行などに活用できます。
STEP
ログインUIの完成
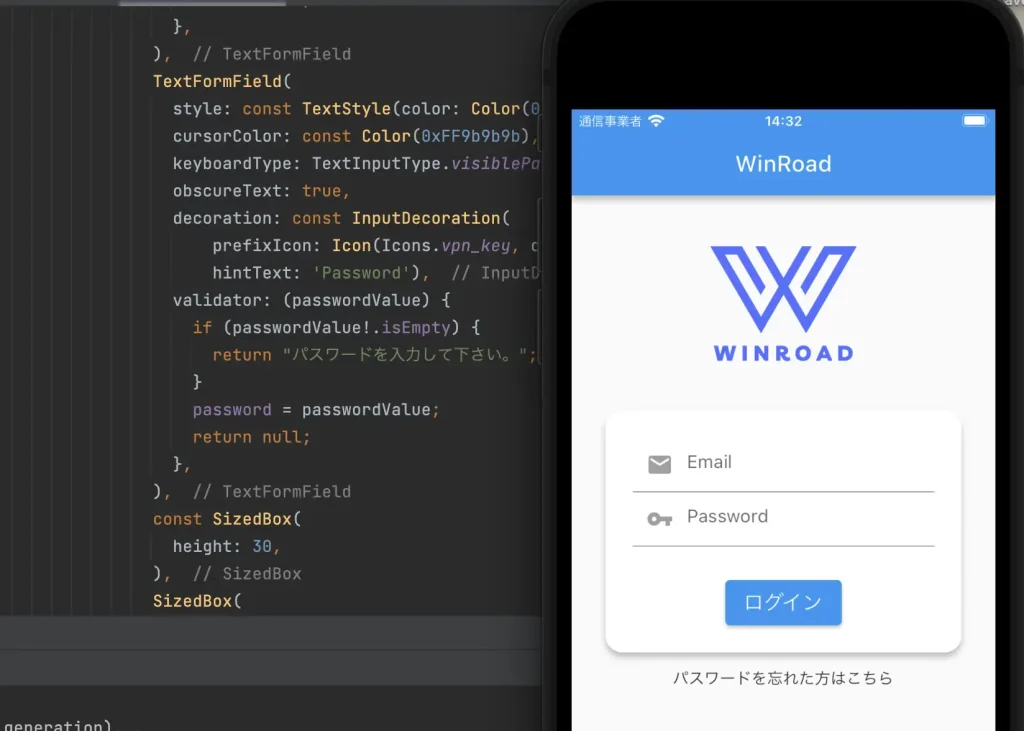
下記のようにレイアウトを若干修正して、ログインUIが完成しました。
lib/views/login_page.dart
import 'package:flutter/material.dart';
import 'package:hooks_riverpod/hooks_riverpod.dart';

class LoginPage extends HookConsumerWidget {
  LoginPage({Key? key}) : super(key: key);

  final TextEditingController emailController = TextEditingController();
  final TextEditingController passwordController = TextEditingController();

  final _formKey = GlobalKey<FormState>();

  @override
  Widget build(BuildContext context, WidgetRef ref) {
    return Scaffold(
      body: Column(
        children: [
          Padding(
            padding: const EdgeInsets.symmetric(vertical: 20.0),
            child: SizedBox(
              width: 150.0,
              height: 150.0,
              child: Image.asset('assets/images/winroad_blue_logo.png'),
            ),
          ),
          Form(
            key: _formKey,
            child: Card(
              elevation: 4.0,
              color: Colors.white,
              margin: const EdgeInsets.only(right: 30, left: 30),
              shape: RoundedRectangleBorder(
                  borderRadius: BorderRadius.circular(15)),
              child: Padding(
                padding: const EdgeInsets.all(24.0),
                child: Column(
                  mainAxisAlignment: MainAxisAlignment.center,
                  children: [
                    TextFormField(
                      controller: emailController,
                      style: const TextStyle(color: Color(0xFF000000)),
                      cursorColor: const Color(0xFF9b9b9b),
                      keyboardType: TextInputType.emailAddress,
                      decoration: const InputDecoration(
                        prefixIcon: Icon(Icons.email, color: Colors.grey),
                        hintText: 'Email',
                      ),
                      validator: (value) {
                        if (value == null || value.isEmpty) {
                          return 'Emailを入力して下さい。';
                        }
                        return null;
                      },
                    ),
                    TextFormField(
                      controller: passwordController,
                      style: const TextStyle(color: Color(0xFF000000)),
                      cursorColor: const Color(0xFF9b9b9b),
                      keyboardType: TextInputType.visiblePassword,
                      obscureText: true,
                      decoration: const InputDecoration(
                          prefixIcon: Icon(Icons.vpn_key, color: Colors.grey),
                          hintText: 'Password'),
                      validator: (value) {
                        if (value == null || value.isEmpty) {
                          return 'パスワードを入力して下さい。';
                        }
                        return null;
                      },
                    ),
                    const SizedBox(
                      height: 30,
                    ),
                    SizedBox(
                      height: 40,
                      child: ElevatedButton(
                        onPressed: () {
                          if (_formKey.currentState!.validate()) {
                            // Todo ログイン用のメソッド作成
                          }
                        },
                        child: const Text(
                          'ログイン',
                          style: TextStyle(fontSize: 18),
                        ),
                      ),
                    )
                  ],
                ),
              ),
            ),
          ),
          const Padding(
            padding: EdgeInsets.all(12.0),
            child: Text('パスワードを忘れた方はこちら'),
          ),
        ],
      ),
    );
  }
}
レイアウトは下記のようになっています。
STEP
ログインUIの解説
コードの詳細は、下記を参考にしてください。
- 4行目:LoginPageクラスは、HookConsumerWidgetを継承しています。これはFlutterのRiverpodライブラリによる状態管理機能を使用するためのクラスです。
- 5行目:コンストラクタでは、オプショナルなkeyを受け取り、基底クラスのコンストラクタに渡しています。
- 7〜8行目:emailControllerとpasswordControllerはユーザーの入力を保持するための変数です。
- 10行目:_formKeyはFormウィジェットの状態を管理するためのキーです。
- 13行目:buildメソッドは、ウィジェットのレイアウトを定義します。
- 14行目:Scaffoldは、アプリの基本的なビジュアルレイアウト構造を提供します。
- 15行目:Columnは、子ウィジェットを垂直(縦)に並べるためのウィジェットです。
- 17行目:Paddingは、ウィジェットにパディング(余白)を追加します。
- 19行目:sizedBoxは、特定のサイズを持つボックスを作成し、ここではロゴの画像を表示しています。
- 25行目:Formウィジェットは、フォームの入力を管理します。
- 27行目:Cardウィジェットは、内容をカード形式で表示し、視覚的な区別をつけるために使用されます。
- 38行目、54行目:TextFormFieldは、ユーザーがメールアドレスとパスワードを入力するためのフィールドです。各フィールドには検証ロジックが含まれており、入力が空でないことを確認します。
- 75行目:ElevatedButtonは、ユーザーがフォームを送信するためのボタンです。このボタンはフォームの状態が有効であればアクションを実行します(現在は、アクションは定義されていませんが、あとで、ログイン用のメソッドを定義します)。
STEP
main.dartの修正
最後に、とりあえずトップに上記のログインページが表示されるように、main.dartを下記のように修正しています。
import 'package:flutter/material.dart';
import 'package:hooks_riverpod/hooks_riverpod.dart';
import 'package:win7jp/views/login_page.dart';

void main() {
  runApp(const ProviderScope(child: MyApp()));
}

class MyApp extends HookConsumerWidget {
  const MyApp({super.key});

  @override
  Widget build(BuildContext context, WidgetRef ref) {
    return MaterialApp(
      title: 'Alcomate',
      debugShowCheckedModeBanner: false,
      theme: ThemeData(
        primarySwatch: Colors.blue,
      ),
      home: Scaffold(
        appBar: AppBar(
          title: const Text('WinRoad'),
        ),
        body: LoginPage(),
      ),
    );
  }
}- 3行目:login_pageをインポートしています。
- 24行目:bodyプロパティにLoginPage()ウィジェットを配置しています。




コメント