
法令でアルコール検知器によるアルコールチェックが義務づけられるようになり、1年間のデータ保存義務が発生するようになりました。手入力でデータを保存するのは、とても面倒なので、アプリでデータを保存するように作成しようと思います。そして、アルコールチェックの本人確認のための画像データもスマホの高画質なデータは必要ないので、WebPで変換して保存したいと思います。
画像の表示
まず最初に、デバイスの画像を表示して、それをWebP形式に変換する機能を実装したいと思います。それでは、画像表示に必要なパッケージをインストールします。
パッケージのインストール
下記コマンドをターミナルで1行ずつ実行します。
flutter pub add image_picker
flutter pub add path_providerイメージUIの作成
ImagePageをHookConsumerWidgetを使用して定義します。
import 'package:flutter/material.dart';
import 'package:hooks_riverpod/hooks_riverpod.dart';

class ImagePage extends HookConsumerWidget {
  const ImagePage({super.key});

  @override
  Widget build(BuildContext context, WidgetRef ref) {
    return Scaffold(
      appBar: AppBar(
        title: const Text('画像ページ', style: TextStyle(color: Colors.white)),
        backgroundColor: Colors.blue,
      ),
      body: Center(
        child: Column(
          mainAxisAlignment: MainAxisAlignment.center,
          children: [
            ElevatedButton(
              onPressed: () {},
              child: const Text('画像選択'),
            ),
          ],
        ),
      ),
    );
  }
}画像管理モデルの作成
freezedで画像情報を管理するためのモデルを作成します。
import 'dart:io';
import 'package:freezed_annotation/freezed_annotation.dart';

part 'image_model.freezed.dart';

@freezed
class ImageModel with _$ImageModel {
  const factory ImageModel({
    File? imageFile, // 元の画像ファイル
    String? originalImagePath, // 元の画像ファイルのパス
    int? originalImageSize, // 元の画像のファイルサイズ(バイト単位)
    String? convertedImagePath, // 変換後の画像ファイルのパス(例: WebP)
    int? convertedImageSize, // 変換後の画像のファイルサイズ(バイト単位)
    // 他に必要な情報があればここに追加
  }) = _ImageModel;
}
buid_runnerします。
flutter pub run build_runner build --delete-conflicting-outputs画像管理用プロバイダーの作成
下記のようにImageModelを管理するためのプロバイダーを作成します。
import 'package:hooks_riverpod/hooks_riverpod.dart';
import '../models/image_model.dart';

final imageProvider = StateNotifierProvider<ImageStateNotifier, ImageModel>((ref) {
  return ImageStateNotifier();
});

class ImageStateNotifier extends StateNotifier<ImageModel> {
  ImageStateNotifier() : super(const ImageModel());

  //ここに画像を選択するメソッドを記述

  // ここに画像をWebPに変換するメソッドを記述
}
画像選択メソッドの作成
画像を選択するメソッドを下記のように作成します。
import 'dart:io';  //追加
import 'package:image_picker/image_picker.dart';  //追加
...
 // 画像を選択するメソッド
  Future<void> pickImage() async {
    final picker = ImagePicker();
    final pickedFile = await picker.pickImage(source: ImageSource.gallery);
    if (pickedFile != null) {
      state = ImageModel(imageFile: File(pickedFile.path));
    }
  }
コードの解説
- 1行目
-
ファイルシステムとのやり取りを可能にするDartの組み込みライブラリです。Fileクラスを利用して、ファイルシステム上のファイルにアクセスします。
- 2行目
-
画像をピックするためのFlutterプラグインimage_pickerをインポートします。これを使って、ユーザーがデバイスのギャラリーから画像を選択できます。
- 5〜11行目
-
pickImageメソッドを非同期(async)で呼び出します。これにより、画像選択プロセスが完了するまでメソッドの実行が待機されます。
- 6行目
-
ImagePicker()のインスタンスを作成します。これは、ユーザーが画像を選択できるようにするためのオブジェクトです。
- 7行目
-
source: ImageSource.gallery を指定して、画像のソースとしてユーザーのギャラリーを使用します。選択された画像ファイルはPickedFileオブジェクトとして返されます。このオブジェクトから画像ファイルへのパスを取得できます。
- 9行目
-
File(pickedFile.path)を使用して、選択された画像のパスからFileオブジェクトを作成します。これにより、画像ファイルにプログラムからアクセスできるようになります。最後に、state(状態)を更新して、選択された画像ファイルを現在のアプリの状態に反映します。
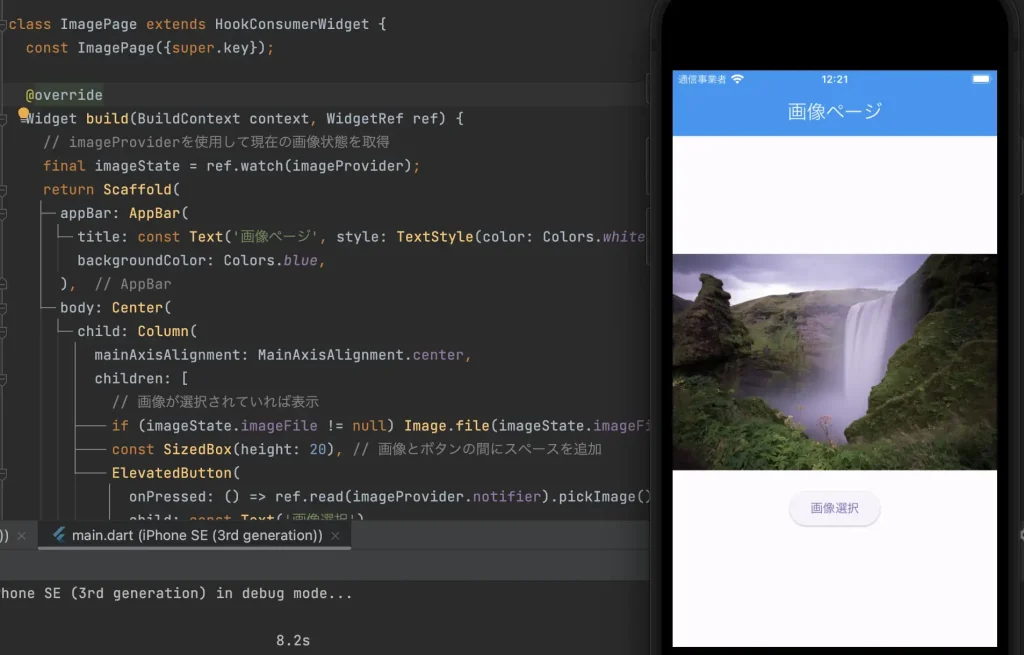
イメージUIの修正
先ほど作成したイメージUIのElevatedButtonをクリックすると、ElevatedButtonの上部に画像が表示されるように修正します。
import 'package:flutter/material.dart';
import 'package:hooks_riverpod/hooks_riverpod.dart';
import '../providers/image_provider.dart';

class ImagePage extends HookConsumerWidget {
  const ImagePage({super.key});

  @override
  Widget build(BuildContext context, WidgetRef ref) {
    // imageProviderを使用して現在の画像状態を取得
    final imageState = ref.watch(imageProvider);
    return Scaffold(
      appBar: AppBar(
        title: const Text('画像ページ', style: TextStyle(color: Colors.white)),
        backgroundColor: Colors.blue,
      ),
      body: SingleChildScrollView(
        child: Center(
          child: Column(
            mainAxisAlignment: MainAxisAlignment.center,
            children: [
              // 画像が選択されていれば表示
              if (imageState.imageFile != null) Image.file(imageState.imageFile!),
              const SizedBox(height: 20), // 画像とボタンの間にスペースを追加
              ElevatedButton(
                onPressed: () => ref.read(imageProvider.notifier).pickImage(),
                child: const Text('画像選択'),
              ),
            ],
          ),
        ),
      ),
    );
  }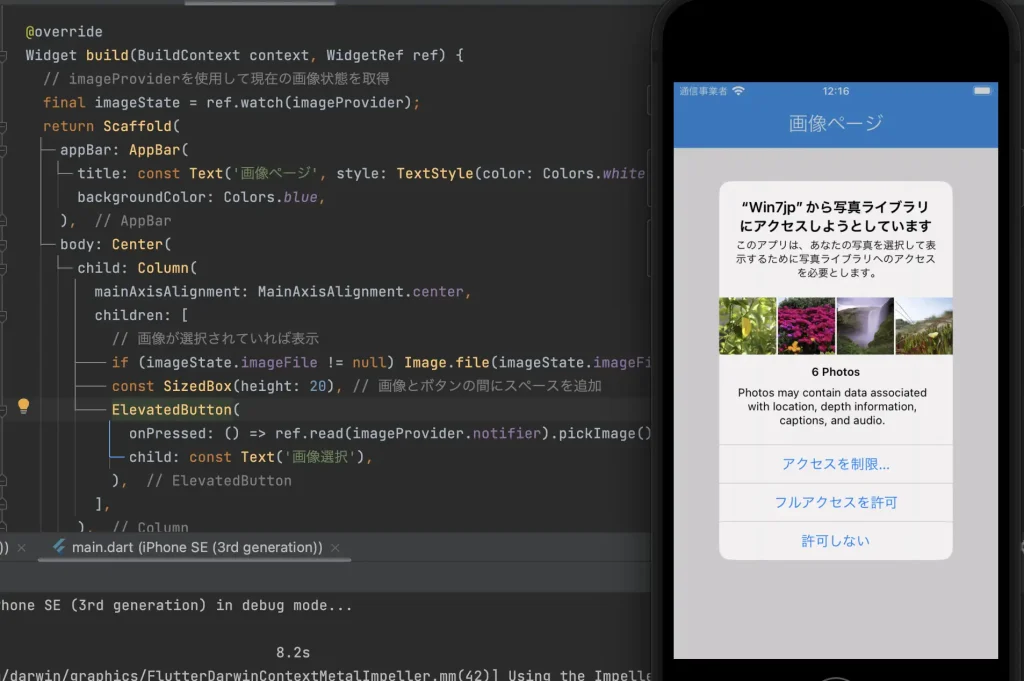
}Info.plistの編集
This app has crashed because it attempted to access privacy-sensitive data without a usage description. The app's Info.plist must contain an NSPhotoLibraryUsageDescription key with a string value explaining to the user how the app uses this data.上記のように表示されたら、iOSアプリが写真ライブラリにアクセスしようとした際に必要な使用許可の説明(NSPhotoLibraryUsageDescription)がInfo.plistファイルに含まれていないことを示しています。iOSアプリでは、プライバシーに敏感なデータにアクセスする際にユーザーに説明を提供する必要があります。これを修正するには、以下の手順を実行します:
- Info.plistを探す: プロジェクトナビゲーターでRunner > Runnerディレクトリの中にあるInfo.plistファイルを見つけます。
- NSPhotoLibraryUsageDescriptionを追加: Info.plistファイルを開いて、</dict>の直前に、新しい行を2行追加します。KeyにNSPhotoLibraryUsageDescriptionを設定し、Valueにアプリがユーザーの写真ライブラリに ※例1)のようにアクセスする理由を説明するテキストを入力します。
- 変更を保存: 編集したInfo.plistファイルを保存します。
- アプリを再ビルド: Xcodeまたはコマンドラインでアプリを再ビルドし、問題が解決されたか確認します。
※例1)
<!-- 既存のキー -->
<key>NSPhotoLibraryUsageDescription</key>
<string>このアプリは、あなたの写真を選択して表示するために写真ライブラリへのアクセスを必要とします。</string>
<!-- 上記の2行を追加 -->
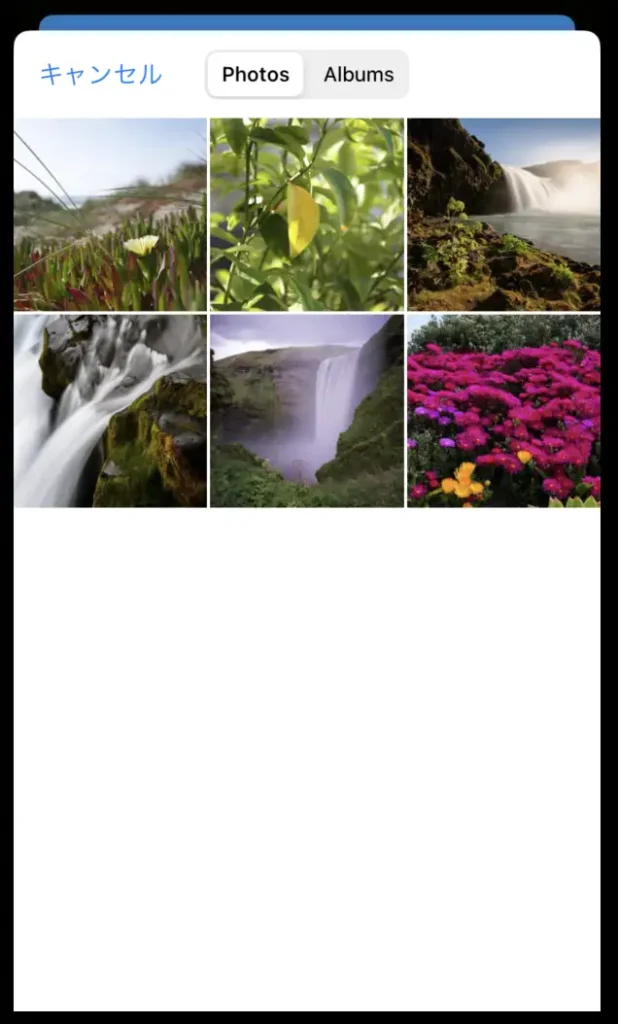
</dict>下記のように表示されます。フルアクセスを許可して、画像を選択してください。
下記のように選択した画像が表示されたら、OKです。
画像の変換
flutter_image_compressのインストール
imageパッケージでも出来ると思って作成してみたのですが、WebPの変換時にエラーが表示されたので、flutter_image_compressパッケージに変更しました。
flutter pub add flutter_image_compress画像変換メソッドの作成
今度は、画像をWebPに変換する為のメソッドをImageStateNotifireに作成します。
import 'package:path_provider/path_provider.dart';  //追加
import 'package:flutter_image_compress/flutter_image_compress.dart';  //追加
...
Future<void> convertToWebP() async {
final pickedFile = state.imageFile;
if (pickedFile != null) {
  final directory = await getApplicationDocumentsDirectory();
  final webPPath = '${directory.path}/converted_image.webp';

  final result = await FlutterImageCompress.compressAndGetFile(
    pickedFile.absolute.path,
    webPPath,
    format: CompressFormat.webp,
  );

  if (result != null) {
    state = ImageModel(
      imageFile: state.imageFile,
      convertedImagePath: result.path,
    );
    print('WebP image saved to ${result.path}');
  }
}
コードの解説
- 1行目
-
ファイルシステムのディレクトリにアクセスするための Flutter プラグインです。この例では、アプリケーションのドキュメントディレクトリにアクセスするために使用されます。
- 2行目
-
画像を圧縮し、異なるフォーマット(この場合は WebP)に変換するための Flutter プラグインです。
- 4〜23行目
-
画像をWebPに変換するメソッド
- 5行目
-
stateからimageFileを取得します。
- 7行目
-
非同期で、アプリケーションのドキュメントディレクトリのパスを取得します。
- 8行目
-
変換後の画像を保存するためのパス(webPPath)を作成します。これはドキュメントディレクトリ内の converted_image.webp ファイルを指します。
- 10〜14行目
-
選択された画像を WebP 形式に変換します。このメソッドは元の画像ファイルのパスと、変換後の画像を保存するパスを引数として受け取ります。
- 16〜22行目
-
変換が成功した場合(result が null でない場合)、変換後の画像ファイルのパスを ImageModel の状態に保存します。また、変換後の画像のパスがコンソールに出力されます。
完成形
ImageModel
ImageModelを下記のように修正しました。
import 'dart:io';
import 'package:freezed_annotation/freezed_annotation.dart';

part 'image_model.freezed.dart';

@freezed
class ImageModel with _$ImageModel {
  const factory ImageModel({
    File? imageFile, // 元の画像ファイル
    String? originalImagePath, // 元の画像ファイルのパス
    int? originalImageSize, // 元の画像のファイルサイズ(バイト単位)
    String? convertedImagePath, // 変換後の画像ファイルのパス(例: WebP)
    int? convertedImageSize, // 変換後の画像のファイルサイズ(バイト単位)
    @Default(false) bool isConverting, // 変換中かどうか
  }) = _ImageModel;
}
14行目にisConvertingプロパティを追加しました。これで、変換中かどうかを判定し、変換中は「ただいま変換中」の文字列とサーキュレーターを表示するように作成するためです。
imageProvider
imageProviderを下記のように修正しました。
import 'dart:io';
import 'package:hooks_riverpod/hooks_riverpod.dart';
import 'package:image_picker/image_picker.dart';
import 'package:path_provider/path_provider.dart';
import 'package:flutter_image_compress/flutter_image_compress.dart';
import '../models/image_model.dart';

final imageProvider = StateNotifierProvider<ImageStateNotifier, ImageModel>((ref) {
  return ImageStateNotifier();
});

class ImageStateNotifier extends StateNotifier<ImageModel> {
  ImageStateNotifier() : super(const ImageModel());

  // 画像を選択するメソッド
  Future<void> pickImage() async {
    final picker = ImagePicker();
    final pickedFile = await picker.pickImage(source: ImageSource.gallery);
    if (pickedFile != null) {
      // 選択された画像ファイルのオブジェクトを作成
      final imageFile = File(pickedFile.path);

      // ファイルサイズを取得
      final fileSize = await imageFile.length();

      // ImageModelの状態を更新
      state = ImageModel(
        imageFile: imageFile,
        originalImagePath: pickedFile.path,
        originalImageSize: fileSize,
      );
    }
  }

  // 画像をWebPに変換するメソッド
  Future<void> convertToWebP() async {
    // 変換処理開始時にisConvertingをtrueに設定
    state = state.copyWith(isConverting: true);
    final originalFile = state.originalImagePath != null ? File(state.originalImagePath!) : null;
    if (originalFile != null) {
      final directory = await getApplicationDocumentsDirectory();
      final webPPath = '${directory.path}/${DateTime.now().millisecondsSinceEpoch}_converted_image.webp';

      final result = await FlutterImageCompress.compressAndGetFile(
        originalFile.absolute.path,
        webPPath,
        format: CompressFormat.webp,
        quality: 60,
      );

      if (result != null) {
        final convertedFileSize = await result.length();
        state = state.copyWith(
          convertedImagePath: result.path,
          convertedImageSize: convertedFileSize,
          isConverting: false,
        );
      }
    }
  }

  // ファイルサイズ変換メソッド
  String formatFileSize(int? fileSize) {
    if (fileSize == null) {
      return '';
    } else if (fileSize < 1024) {
      return '$fileSize B';
    } else if (fileSize < 1024 * 1024) {
      return '${(fileSize / 1024).toStringAsFixed(1)} KB';
    } else if (fileSize < 1024 * 1024 * 1024) {
      return '${(fileSize / (1024 * 1024)).toStringAsFixed(1)} MB';
    } else {
      return '${(fileSize / (1024 * 1024 * 1024)).toStringAsFixed(1)} GB';
    }
  }
}
pickImageメソッド
16〜33行目:ImagePickerを使用して、ユーザーによる画像ファイルの選択を可能にします。
27〜31行目:選択された画像ファイルに関する情報(ファイル自体、パス、サイズ)をImageModelのstateにセットします。
convertToWebpメソッド
38行目:変換処理開始時にisConvertingをtrueに設定します。これで、変換中は、サーキュレーターを表示することが出来ます。
39行目:開始時にorginalFileを初期化することで、2回目以降のファイル選択がきちんと出来るようになります。これがなければ、同じファイルを何度も変換することになります。
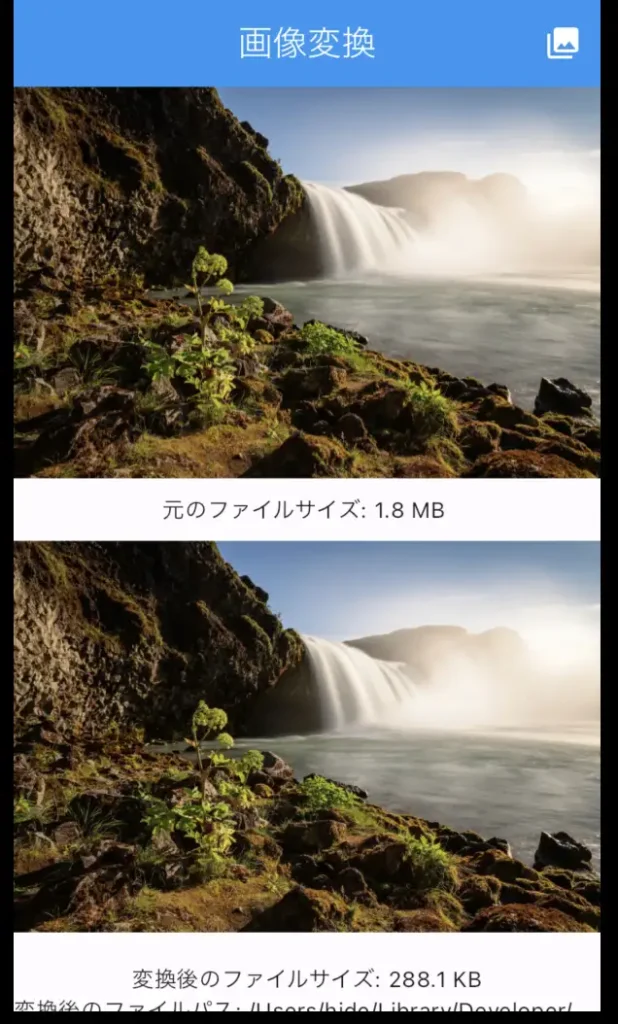
48行目:画像サイズを小さくするために、品質を60%程度にしていますが、この辺は好みで設定してください。品質100%程度でもWebPはjpegの3分の1程度の画像サイズになります。
51〜59行目:変換後の画像ファイルのパスとサイズをImageModelのstateにセットしています。尚、isConvertingのfalseに戻しています。
formatFileSizeメソッド
63〜75行目:ファイルサイズを人間が読みやすい形式(バイト、キロバイト、メガバイト、ギガバイト)に変換するために作成しました。
ImagePage
イメージページのUIを上記の様に変更しました。
import 'dart:io';
import 'package:flutter/material.dart';
import 'package:flutter_hooks/flutter_hooks.dart';
import 'package:hooks_riverpod/hooks_riverpod.dart';
import '../providers/image_provider.dart';
class ImagePage extends HookConsumerWidget {
const ImagePage({super.key});
@override
Widget build(BuildContext context, WidgetRef ref) {
final imageState = ref.watch(imageProvider);
final imageNotifier = ref.read(imageProvider.notifier);
// 初期化時に一度だけ画像選択をトリガーする
useEffect(() {
WidgetsBinding.instance.addPostFrameCallback((_) {
imageNotifier.pickImage();
});
return null;
}, const []);
return Scaffold(
appBar: AppBar(
title: const Text('画像変換', style: TextStyle(color: Colors.white)),
backgroundColor: Colors.blue,
actions: <Widget>[
IconButton(
icon: const Icon(Icons.photo_library, color: Colors.white),
onPressed: () => imageNotifier.pickImage(),
tooltip: '画像選択',
),
],
),
body: SingleChildScrollView(
child: Center(
child: Column(
mainAxisAlignment: MainAxisAlignment.center,
children: [
if (imageState.isConverting) ...[
// 変換中はプログレスバーを表示
const SizedBox(height: 200),
const CircularProgressIndicator(),
const SizedBox(height: 20),
const Text('ただいまWebPに変換中'),
] else ...[
// 画像が選択されていれば表示
if (imageState.imageFile != null)
Image.file(imageState.imageFile!),
const SizedBox(height: 10),
// 元のファイルサイズとパスの表示
if (imageState.imageFile != null) ...[
Text(
'元のファイルサイズ: ${imageNotifier.formatFileSize(imageState.originalImageSize)} '),
],
const SizedBox(height: 10),
// 変換後のファイルサイズとパスの表示
if (imageState.convertedImagePath != null) ...[
Image.file(File(imageState.convertedImagePath!)),
const SizedBox(height: 20),
Text(
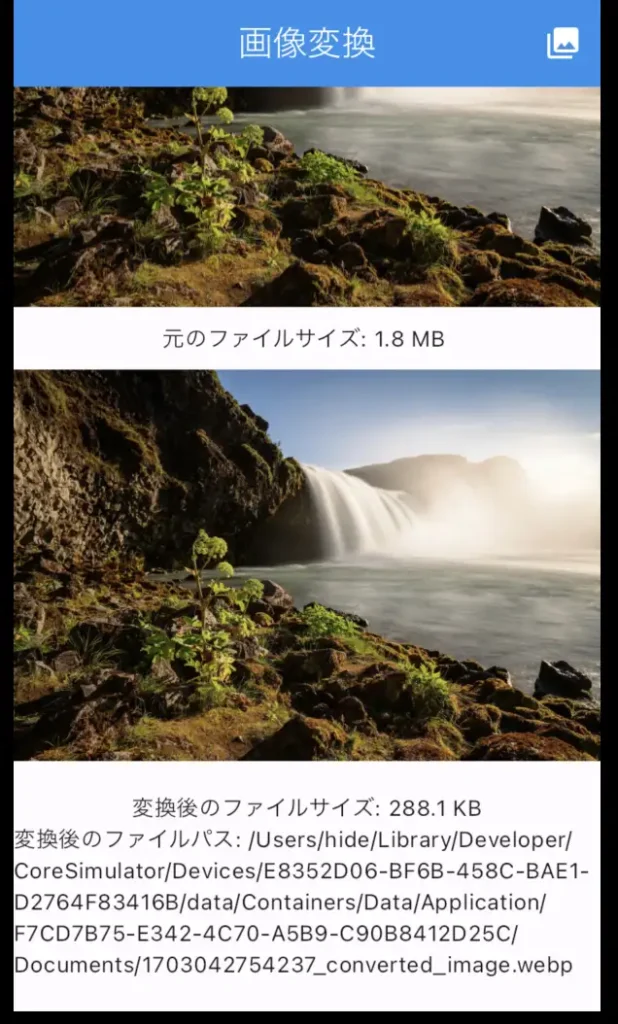
'変換後のファイルサイズ: ${imageNotifier.formatFileSize(imageState.convertedImageSize)}'),
Text('変換後のファイルパス: ${imageState.convertedImagePath}'),
const SizedBox(height: 20),
],
],
],
),
),
),
// 画像が選択されている場合にのみFloatingActionButtonを表示
floatingActionButton: (imageState.imageFile != null &&
imageState.convertedImagePath == null)
? FloatingActionButton(
onPressed: () => imageNotifier.convertToWebP(),
tooltip: 'WebPに画像変換',
backgroundColor: Colors.red,
child: const Icon(Icons.transform, color: Colors.white),
)
: null,
);
}
}ElevatedButtonの削除
26〜32行目:ElevatedButtonを削除し、AppBarにアイコンボタンを作成しました。AppBarのアイコンボタンをタップすると、画像一覧が表示されるように修正しました。
デフォルトで画像一覧表示
15〜20行目:ElevatedButtonを削除したことで、デフォルトでbodyに何も表示されないので、useEffectを使用してページを開いたときに、デフォルトで画像選択が表示されるように修正しました。
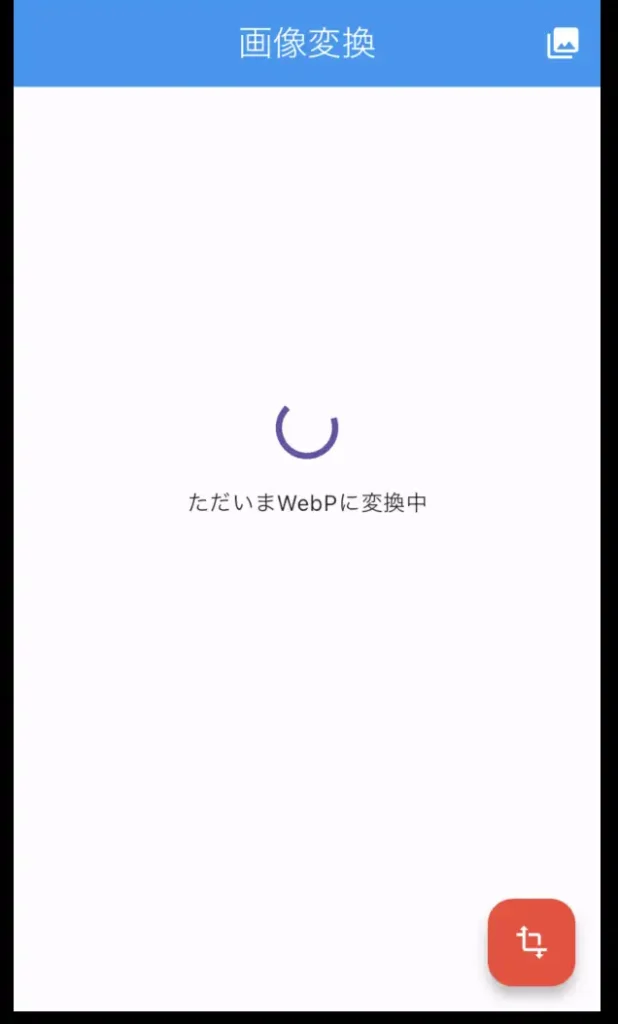
サーキュレーターの表示
画像変換に若干時間がかかるので、サーキュレーター(プログレスバー)と「ただいまWebPに変換中」の文字列が表示されるように修正しました。
FloatingActionButton
71〜80行目:画像変換用に、FloatingActionButtonを作成しました。画像が選択されているときに表示され、変換後は消えるようにしました。
スマホの表示例を下記に記載しておきますので、ご覧下さい。


コメント