簡単な画像管理アプリを作成してみたいと思います。前回のLaravelに画像をアップしてみようをバージョンアップして作成してみます。
基本構想
コントローラーとルーティング
リソースコントローラを使用すると、一連の関連するアクション(CRUD操作:作成、読み取り、更新、削除)を簡単に管理できます。Laravelのリソースコントローラはこれらの操作に対応するメソッドを予め定義しています。画像管理アプリにおいては、この機能を活用して効率的にコードを整理できます。
コントローラーはリソースコントローラーを使用します。
データベース
imagesテーブルに、WordPressのように、base画像、小さい画像、サムネイル画像をそれぞれ、呼び出せるような構造にします。
モデル
Eloquentモデルを使用します。
ストレージ
Laravel内部のStorageではなく、/var/www/storageに保存します。
初期設定
コントローラーの作成
php artisan make:controller ImageController --resource下記の様なコントローラーが生成されました。
<?php
namespace App\Http\Controllers;
use Illuminate\Http\Request;

class ImageController extends Controller
{
    public function index(){}
    public function create(){}
    public function store(Request $request) {}
    public function show(string $id) {}
    public function edit(string $id) {}
    public function update(Request $request, string $id) {}
    public function destroy(string $id) {}
}
上記は、余分な表記はカットして、わかりやすく表示していますが、7つのメソッドが既に生成されています。
7つのメソッドの使い方
Laravelのリソースコントローラでは、CRUD(作成、読み取り、更新、削除)操作に対応する7つのメソッドが一般的に使用されます。以下では、ImageController 内の各メソッドの使い方を説明します。
1. index()
目的: 画像の一覧を表示します。
使用方法:
- 通常、データベースから全ての画像データを取得し、それらをビューに渡して表示します。
- 例:Image::all()を使用して全画像を取得し、ビューに渡します。
2. create()
目的: 画像アップロードのためのフォームを表示します。
使用方法:
- 画像アップロード用のビューを返します。
- 特にデータを渡す必要はありません。
3. store(Request $request)
目的: フォームから送信された画像を受け取り、保存します。
使用方法:
- $requestから画像データを取得します。
- 画像をサーバーに保存し、必要に応じてデータベースに画像情報を記録します。
- 保存処理後、適切なリダイレクとレスポンスを返します。
4. show(String $id)
目的: 特定の画像の詳細情報を表示します。
使用方法:
- $idを使って特定の画像をデータベースから取得します。
- 取得した画像情報をビューに渡して表示します。
5. edit(String $id)
目的: 特定の画像を編集するためのフォームを表示します。
使用方法:
- $id を使って編集する画像をデータベースから取得します。
- 取得した画像情報を編集用のビューに渡します。
6. update(Request $request, String $id)
目的: 編集フォームから送信されたデータを使って、特定の画像情報を更新します。
使用方法:
- $id を使って特定の画像をデータベースから取得し、$request のデータで更新します。
- 更新処理後、適切なリダイレクトレスポンスを返します。
7. destroy(String $id)
目的: 特定の画像を削除します。
使用方法:
- $id を使って削除する画像をデータベースから取得し、削除します。
- 削除処理後、適切なリダイレクトレスポンスを返します。
これらのメソッドを適切に実装することで、画像に関する一連の操作を効率的に管理できます。また、これらのメソッドはリソースルーティングを使って簡単にルートに割り当てることができます。
ルーターの作成
LaravelでImageControllerのリソースフルルーティングを作成し、ミドルウェアにJetStreamの認証を設定する例です。
リソースフルルーティングは Route::resource メソッドを使用して定義します。このメソッドは最初の引数にリソース名(URLに使用される)、二番目の引数にコントローラ名を取ります。
use App\Http\Controllers\ImageController; //追加

Route::middleware(['auth:sanctum', 'verified'])->group(function () {
    // ImageControllerのリソースフルルーティング
    Route::resource('/images', ImageController::class);
});
このコードは以下のルートを生成します:
- GET /images => indexメソッド(画像の一覧表示)
- GET /images/create => create メソッド(画像アップロードフォームの表示)
- POST /images => store メソッド(画像のアップロード処理)
- GET /images/{image} => showメソッド(画像の詳細表示)
- GET /images/{image}/edit => editメソッド(画像の編集フォーム表示)
- PUT/PATCH /images/{image} => updateメソッド(画像の更新処理)
- DELETE /images/{image} => destroy メソッド(画像の削除)
ここで、{image} は画像のIDまたは識別子を示すルートパラメータです。
テーブルに新規カラムの追加
前回作ったimagesテーブルにMサイズの画像用パスとサイズ、サムネイル画像用パスとサイズのカラムを追加します。
php artisan make:migration add_thumbnail_fields_to_images_table下記の様に記述します。
<?php

use Illuminate\Database\Migrations\Migration;
use Illuminate\Database\Schema\Blueprint;
use Illuminate\Support\Facades\Schema;

class AddThumbnailFieldsToImagesTable extends Migration
{
    public function up()
    {
        Schema::table('images', function (Blueprint $table) {
            $table->string('m_image_path')->nullable()->after('size');
            $table->integer('m_image_size')->nullable()->after('m_image_path');
            $table->string('thumbnail_path')->nullable()->after('m_image_size');
            $table->integer('thumbnail_size')->nullable()->after('thumbnail_path');
        });
    }

    public function down()
    {
        Schema::table('images', function (Blueprint $table) {
            $table->dropColumn('m_image_path');
            $table->dropColumn('m_image_size');
            $table->dropColumn('thumbnail_path');
            $table->dropColumn('thumbnail_size');
        });
    }
}DBの作成(※新規作成の場合)
imagesテーブルを作成していない場合、STEP9とSTP10を実行します。※既にimagesテーブルがある場合は、STEP9とSTEP10を飛ばしてください。
php artisan make:migration create_images_tableマイグレーションファイルの編集(※新規作成の場合)
下記の様に記述します。
<?php

use Illuminate\Database\Migrations\Migration;
use Illuminate\Database\Schema\Blueprint;
use Illuminate\Support\Facades\Schema;
use Illuminate\Support\Facades\DB;

class CreateImagesTable extends Migration
{
    public function up()
    {
        Schema::create('images', function (Blueprint $table) {
            $table->id();
            $table->uuid('uuid')->unique();
            $table->string('name');
            $table->string('path');
            $table->integer('size')->nullable();
            $table->string('m_image_path')->nullable();
            $table->string('m_image_size')->nullable();
            $table->string('thumbnail_path')->nullable();
            $table->string('thumbnail_size')->nullable();
            $table->timestamps();
            $table->softDeletes();

            // インデックスを追加する。
            $table->index('uuid');
        });
    }

    public function down()
    {
        Schema::dropIfExists('images');
    }
}マイグレーションの実行
マイグレーションを実行します。
php artisan migrateモデルの修正
前回作ったモデルの $fillableに今回追加したカラムを追加します。
// 'm_image_path', 'm_image_size', 'thumbnail_path', 'thumbnail_size'を追加記述
protected $fillable = [
        'uuid', 'name', 'path', 'size', 'm_image_path', 'm_image_size', 'thumbnail_path', 'thumbnail_size'
];モデルの作成(※新規作成の場合)
新規作成の場合は、STEP13を実行します。
php artisan make:model Image下記の様に記述します。
<?php

namespace App\Models;

use Illuminate\Database\Eloquent\Factories\HasFactory;
use Illuminate\Database\Eloquent\Model;
use Illuminate\Database\Eloquent\SoftDeletes;   // SoftDeletesを使用する。
use Illuminate\Support\Str; // Strを使用する(uuidを生成するために使用する。)

class Image extends Model
{
    use HasFactory;
    use SoftDeletes;

    protected $fillable = [
        'uuid',
        'name',
        'path',
        'size',
        'm_image_path',
        'm_image_size',
        'thumbnail_path',
        'thumbnail_size',
    ];
    protected $dates = [
        'deleted_at',
    ];
    protected $hidden = [
        'id',
        'deleted_at',
    ];
    protected $casts = [
        'uuid' => 'string',
        'name' => 'string',
        'path' => 'string',
        'size' => 'integer',
        'm_image_path' => 'string',
        'm_image_size' => 'integer',
        'thumbnail_path' => 'string',
        'thumbnail_size' => 'integer',
    ];
    protected static function boot()
    {
        parent::boot();
        static::creating(function ($model) {
            // モデルが作成される前に、UUIDを生成して割り当てます。
            if (empty($model->uuid)) {
                $model->uuid = Str::uuid();
            }
        });
    }
}
uuidライブラリの追加(※新規作成の場合)
前回作成した人はSTEP14は飛ばしてください。新規作成の人は、下記を実行します。
Composerを使って ramsey/uuid ライブラリをインストールします。
composer require ramsey/uuid詳細は、Laravelに画像をアップしてみようのSTEP15〜STEP17を参照してください。
新規ビューディレクトリの作成
ビューをディレクトリで管理したいので、下記を実行して、イメージ用の新規ビューを作成します。
sudo mkdir -p /var/www/storage/images
sudo chown -R www-data:www-data /var/www/storage
sudo chmod -R 775 /var/www/storageシンボリックリンクの作成
まず、既存のシンボリックリンクを削除します。
sudo rm /var/www/laravel/public/storageそして、新しくシンボリックリンクを作成します。
ln -s /var/www/storage /var/www/laravel/public/storageスタイルテンプレートの作成
views/layoutsディレクトリに基本となるテンプレートbase.blade.phpを作成し、下記を入力します。
<!DOCTYPE html>
<html lang="{{ str_replace('_', '-', app()->getLocale()) }}">
<head>
    <meta charset="UTF-8">
    <meta name="viewport" content="width=device-width, initial-scale=1.0">
    <title>@yield('title')</title>
    @vite('resources/css/app.css')
    @livewireStyles
    </head>
    <body class="font-sans antialiased">
        @livewire('header-menu')
        @yield('content')
        @livewireScripts
</body>
</html>Livewireでヘッダーメニューの作成
ヘッダーメニューを下記の様に作成します。
php artisan make:livewire header-menuこのコマンドにより、app/Http/Livewire/HeaderMenu.php と resources/views/livewie/header-menu.blade.php の2つのファイルが生成されます。
header-menu.blade.php ファイルを編集して、ヘッダーメニューのマークアップを追加します。
<div x-data="{ isOpen: false }">
    <div class="bg-gray-800">
        <nav class="flex items-center justify-between flex-wrap py-1 px-4">
            <div class="flex items-center flex-shrink-0 text-white mr-6">
                <a href="/images" class="font-semibold text-base tracking-tight">WinRoad徒然草</a>
            </div>
            <div class="block sm:hidden">
                <button @click="isOpen = !isOpen" class="flex items-center px-3 py-2 border rounded text-teal-200 border-teal-400 hover:text-white hover:border-white">
                    <svg class="fill-current h-3 w-3" viewBox="0 0 20 20" xmlns="http://www.w3.org/2000/svg">
                        <title>Menu</title>
                        <path d="M0 3h20v2H0zM0 9h20v2H0zM0 15h20v2H0z" />
                    </svg>
                </button>
            </div>
            <div :class="{'block': isOpen, 'hidden': !isOpen}" class="w-full sm:flex sm:items-center sm:w-auto sm:justify-end">
                <div class="text-sm sm:flex-grow">
                    <a href="#" class="block mt-4 sm:inline-block sm:mt-0 text-teal-200 hover:text-white mr-4">
                        Flutter<br class="hidden sm:block">
                        <span class="text-xs text-teal-200 hover:text-white">フラッター</span>
                    </a>
                    <a href="#" class="block mt-4 sm:inline-block sm:mt-0 text-teal-200 hover:text-white mr-4">
                        WordPress<br class="hidden sm:block">
                        <span class="text-xs text-teal-200 hover:text-white">ワードプレス</span>
                    </a>
                    <a href="#" class="block mt-4 sm:inline-block sm:mt-0 text-teal-200 hover:text-white mr-4">
                        Laravel<br class="hidden sm:block">
                        <span class="text-xs text-teal-200 hover:text-white">ララベル</span>
                    </a>
                    <a href="#" class="block mt-4 sm:inline-block sm:mt-0 text-teal-200 hover:text-white mr-4">
                        Ubuntu<br class="hidden sm:block">
                        <span class="text-xs text-teal-200 hover:text-white">ウブンツ</span>
                    </a>
                    <a href="#" class="block mt-4 sm:inline-block sm:mt-0 text-teal-200 hover:text-white mr-4">
                        Swell<br class="hidden sm:block">
                        <span class="text-xs text-teal-200 hover:text-white">スウェル</span>
                    </a>
                </div>
            </div>
        </nav>
    </div>
</div>
WinRoad徒然草のヘッダーと同じように作成してみました。
コントローラの編集
indexメソッドの修正
ImageControllerのindexメソッドを下記の様に修正します。
use App\Models\Image; //追加記述
// ....
public function index()
{
    // Imageモデルから全画像をページネーションを使って取得
    $images = Image::paginate(10); // 1ページあたり10件のデータを表示

    // 取得した画像データをビューに渡す
    return view('images.index', compact('images'));
}
このコードでは、Image::paginate(10)を使って、データベースから画像データを1ページにつき10件ずつ取得しています。paginateメソッドはLaravelのページネーション機能を提供し、自動的にページングを処理してくれます。
indexビューの作成
@extends('layouts.base')

@section('title', '画像一覧表示')

@section('content')
<div class="container mx-auto">
    <div class="flex justify-between items-center my-4">
        <h1 class="text-lg font-bold">画像一覧</h1>
        <a href="{{ route('images.create') }}" class="btn btn-primary">新規追加</a>
    </div>

    <div class="flex flex-wrap">
        @if(count($images) === 0)
        <p>画像はありません</p>
        @else
            @foreach ($images as $image)
            <div class="w-full md:w-1/2 lg:w-1/4 px-2 mb-4">
                <div class="bg-white p-4 rounded-lg shadow-md">
                    <a href="{{ route('images.show', $image->id) }}">
                        <img src="{{ asset($image->m_image_path) }}" alt="{{ $image->name }}" class="w-full h-auto object-cover rounded">
                    </a>
                    <p class="text-center mt-2 truncate">{{ $image->name }}</p>
                </div>
            </div>
            @endforeach
        @endif
    </div>

    <!-- ページネーションリンク -->
    <div class="mt-4">
        {{ $images->links() }}
    </div>
</div>
<!-- アップロード成功メッセージ -->
@if (session('success'))
<div class="bg-green-100 border-l-4 border-green-500 text-green-700 p-4 mt-4 mx-auto w-1/2 text-center" role="alert">
    <p>{{ session('success') }}</p>
</div>
@endif
@endsection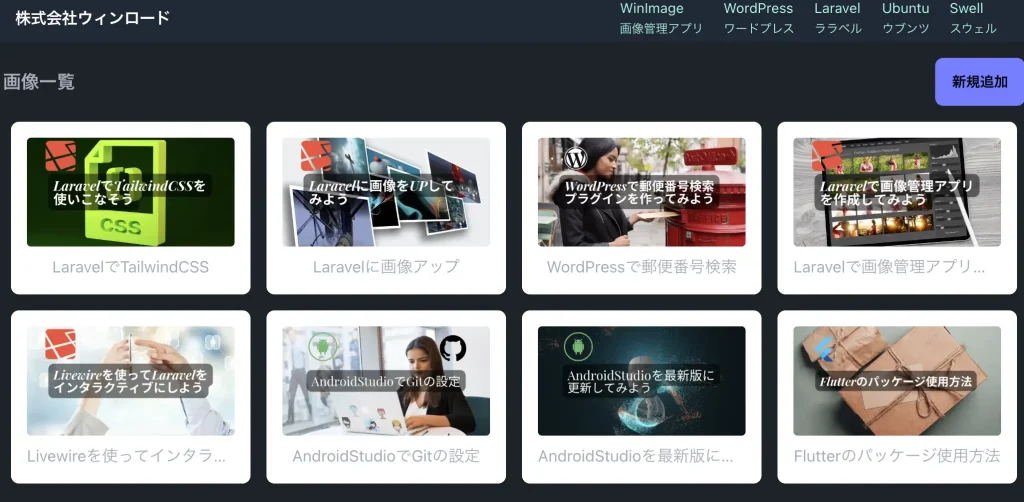
createメソッドの修正
ImageControllerのcreateメソッドを下記の様に修正します。
public function create()
    {
        // 画像アップロードフォームのビューを返す
        return view('images.create');
}createビューの作成
createビューは前回のimage-uploadをそのまま使用します。
@extends('layouts.base')

@section('title', '画像アップロード')

@section('content')
<div class="max-w-md mx-auto my-10 bg-white p-5 rounded-md shadow-sm">
    <div class="text-center">
        <h1 class="my-3 text-3xl font-semibold text-gray-700">画像アップロード</h1>
        <p class="text-gray-400">アップロードする画像を選択してください</p>
    </div>

    <div class="m-7">
        <form action="/images" method="POST" enctype="multipart/form-data">
            @csrf
            <div class="mb-6">
                <label for="image" class="block mb-2 text-sm text-gray-600">画像</label>
                <input type="file" name="image" id="image" class="w-full px-3 py-2 text-gray-700 bg-white border border-gray-300 rounded-md focus:outline-none" required>
            </div>
            <div class="mb-6">
                <button type="submit" class="w-full px-3 py-4 text-white bg-blue-500 rounded-md focus:bg-blue-600 focus:outline-none">アップロード</button>
            </div>
        </form>
    </div>
</div>

<!-- アップロード成功メッセージ -->
@if (session('success'))
<div class="bg-green-100 border-l-4 border-green-500 text-green-700 p-4 mt-4 mx-auto w-1/2 text-center" role="alert">
    <p>{{ session('success') }}</p>
</div>
@endif
@endsection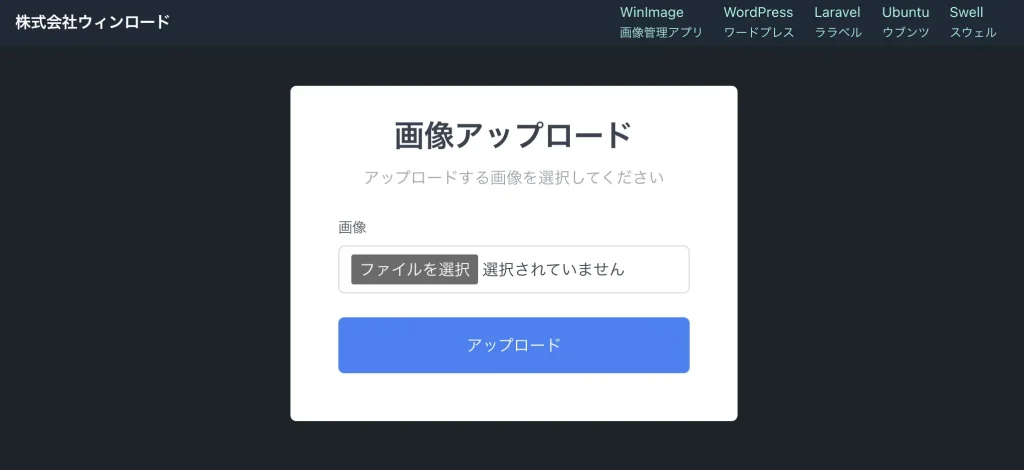
storeメソッドの修正
use Intervention\Image\Facades\Image as ImageIntervention;  //追加
use Illuminate\Support\Facades\Storage;  //追加
use Illuminate\Support\Str; //追加
...
 // 画像アップロード処理
public function store(Request $request)
{
    $request->validate([
        'image' => 'required|image|max:2048', // 画像ファイルのバリデーション
    ]);

    $file = $request->file('image');
    $originalName = $file->getClientOriginalName();
    $timestamp = time();
    $newPath = 'storage/images/';

    // 拡張子を除いたファイル名の取得
    $filenameWithoutExt = pathinfo($originalName, PATHINFO_FILENAME);

    // オリジナルの画像インスタンスを生成
    $originalImage = ImageIntervention::make($file);

    // 元のサイズでWebP保存
    $newName = $timestamp . '_' . $filenameWithoutExt . '.webp';
    $encodedOriginal = $originalImage->encode('webp', 80);
    Storage::disk('custom_images')->put($newName, (string) $encodedOriginal);
    $size = strlen((string) $encodedOriginal); // サイズを取得

    // 縦横半分のサイズでWebP保存
    $m_image = ImageIntervention::make($file)->resize($originalImage->width() / 2, $originalImage->height() / 2);
    $encodedMImage = $m_image->encode('webp', 80);
    $m_image_path = $timestamp . '_' . $filenameWithoutExt . '_half.webp';
    Storage::disk('custom_images')->put($m_image_path, (string) $encodedMImage);
    $m_image_size = strlen((string) $encodedMImage); // サイズを取得

    // 200x200で中央をクロップしてWebP保存
    $thumbnail_image = ImageIntervention::make($file)->fit(200, 200);
    $encodedThumbnail = $thumbnail_image->encode('webp', 80);
    $thumbnail_path = $timestamp . '_' . $filenameWithoutExt . '_thumb.webp';
    Storage::disk('custom_images')->put($thumbnail_path, (string) $encodedThumbnail);
    $thumbnail_size = strlen((string) $encodedThumbnail); // サイズを取得

    // データベースに画像情報を保存
    $image = new Image;
    $image->uuid = Str::uuid();
    $image->name = $filenameWithoutExt;
    $image->path = $newPath . $newName;
    $image->size = $size;
    $image->m_image_path = $newPath . $m_image_path;
    $image->m_image_size = $m_image_size;
    $image->thumbnail_path = $newPath . $thumbnail_path;
    $image->thumbnail_size = $thumbnail_size;
    $image->save();

    return redirect()->route('images.index')->with('success', '画像がアップロードされました。');
}ImageInterventionがインストールされていない場合は、composerでインストールして下さい。詳細は、前回のLaravelに画像をアップしてみようのSTEP21〜24に記載しています。
showメソッドの修正
下記の様にImageControllerにshowメソッドを作成します。
public function show(String $id)
{
    // Image モデルを ID で検索
    $image = Image::findOrFail($id);

    // ビューにデータを渡す
    return view('images.show', compact('image'));
}ビューの作成
views/images/show.blade.phpを作成します。
@extends('layouts.base')

@section('title', '画像詳細')

@section('content')
    <div class="container mx-auto p-4">
        <div class="card card-bordered">
            <figure>
                <img src="{{ asset($image->path) }}" alt="{{ $image->name }}" class="rounded-t-lg">
            </figure>
            <div class="card-body">
                <h2 class="card-title">{{ $image->name }}</h2>
                <p>サイズ: {{ formatBytes($image->size) }}</p> <!-- ここにサイズを表示 -->
                <!-- ここにその他の画像詳細情報を表示 -->
                <div class="justify-end card-actions">
                    <a href="{{ route('images.index') }}" class="btn btn-primary">一覧に戻る</a>
                    <a href="{{ route('images.edit', $image->id) }}" class="btn btn-success">編集</a>
                    <a href="{{ route('images.download', $image->uuid) }}" class="btn btn-secondary">Download</a>
                    <form action="{{ route('images.destroy', $image->uuid) }}" method="POST" onsubmit="return confirm('本当に削除しますか?');">
                        @csrf
                        @method('DELETE')
                        <button type="submit" class="btn btn-error">削除</button>
                    </form>
                </div>
            </div>
        </div>
    </div>
@endsection
DeleteやDownloadに関しては、idでは無くて、uuidを使用しています。idだとブラウザから直接入力で、削除やダウンロードが出来るので、セキュリティの観点から、uuidにしています。
editメソッドの修正
editメソッドを下記の様に作成します。
public function edit(String $id)
{
    // IDに基づいて画像を検索
    $image = Image::findOrFail($id);

    // 編集ビューを表示し、画像オブジェクトを渡す
    return view('images.edit', compact('image'));
}editビューの作成
editビューを下記の様に作成します。単純に画像タイトルのみの編集です。
@extends('layouts.base')

@section('title', 'タイトル編集')

@section('content')
<div class="container mx-auto p-4">
    <h1 class="text-lg font-bold mb-4">画像タイトル編集</h1>

    <form action="{{ route('images.update', $image->id) }}" method="POST" enctype="multipart/form-data">
        @csrf
        @method('PUT')

        <div class="mb-4">
            <label for="name" class="block text-sm font-medium text-gray-700">画像名</label>
            <input type="text" id="name" name="name" value="{{ $image->name }}" class="mt-1 block w-full rounded-md border-gray-300 shadow-sm">
        </div>

        <!-- その他の編集可能なフィールド -->

        <div class="flex justify-start gap-4">
            <button type="button" onclick="window.history.back();" class="btn btn-secondary">戻る</button>
            <button type="submit" class="btn btn-primary">更新</button>
        </div>
    </form>
</div>
@endsectionupdateメソッドの修正
updateメソッドを下記の様に修正します。
public function update(Request $request, String $id)
{
    // バリデーション
    $validated = $request->validate([
        'name' => 'required|string|max:255',
        // その他の必要なバリデーションルール
    ]);

    // IDに基づいて画像を検索
    $image = Image::findOrFail($id);

    // データの更新
    $image->name = $request->name;
    // その他のフィールドも同様に更新
    $image->save();

    // 更新後、適切なリダイレクト先へ
    return redirect()->route('images.index')
                     ->with('success', '画像情報が更新されました');
}destoryメソッドの作成
下記の様にdestroyメソッドを作成します。
use Illuminate\Support\Facades\File;  //追加
...

// 画像削除処理
public function destroy($uuid) {
    // UUIDに基づいて画像を検索
    $image = Image::where('uuid', $uuid)->firstOrFail();

    // 画像ファイルの削除
    $paths = [$image->path, $image->m_image_path, $image->thumbnail_path];
    foreach($paths as $path) {
        if($path && File::exists(public_path($path))) {
            File::delete(public_path($path));
        }
    }

    // データベースから画像レコードの削除
    $image->forceDelete();

    // 削除後、適切なリダイレクト先へ
    return redirect()->route('images.index')
        ->with('success', '画像が削除されました');
}filesystems.phpの修正
filesystems.phpに下記を追加してください。
disks' => [
...

  'custom_images' => [
            'driver' => 'local',
            'root' => '/var/www/storage/images',
            'url' => env('APP_URL').'/images',
            'visibility' => 'public',
        ],
],
追加機能
ダウンロード機能
リソースコントローラーの7つの機能以外に追加機能としてダウンロード機能を追加したくなったので、追加方法をご紹介します。
ダウンロードメソッドの追加
メソッドは、そのままImageControllerの中に追加記述します。
// 画像ダウンロード処理
public function download(String $uuid)
{
    // UUIDに基づいて画像を検索
    $image = Image::where('uuid', $uuid)->firstOrFail();

    // 実際のファイルパスを取得
    $path = '/var/www/storage/images/' . basename($image->path);

    // ファイルが存在するか確認
    if (!File::exists($path)) {
        abort(404);
    }

    // ファイルの内容を取得
    $fileContent = File::get($path);

    // ファイルタイプを取得
    $fileType = File::mimeType($path);

    // 画像をダウンロードするためのレスポンスを作成
    return Response::make($fileContent, 200, [
        'Content-Type' => $fileType,
        'Content-Disposition' => 'attachment; filename="' . basename($image->path) . '"'
    ]);
}
ルーターへの追加記述
リソースControllerに追加のメソッドを記述する場合は、リソースルーターの前に記述して下さい。
// 画像ダウンロード(リソースルートより前に記述する必要がある)
Route::get('/images/download/{id}', [ImageController::class, 'download'])->name('images.download');
// 画像に関するリソースルート CRUD(作成、読み取り、更新、削除)
Route::resource('images', ImageController::class);カスタムヘルパー関数の作成
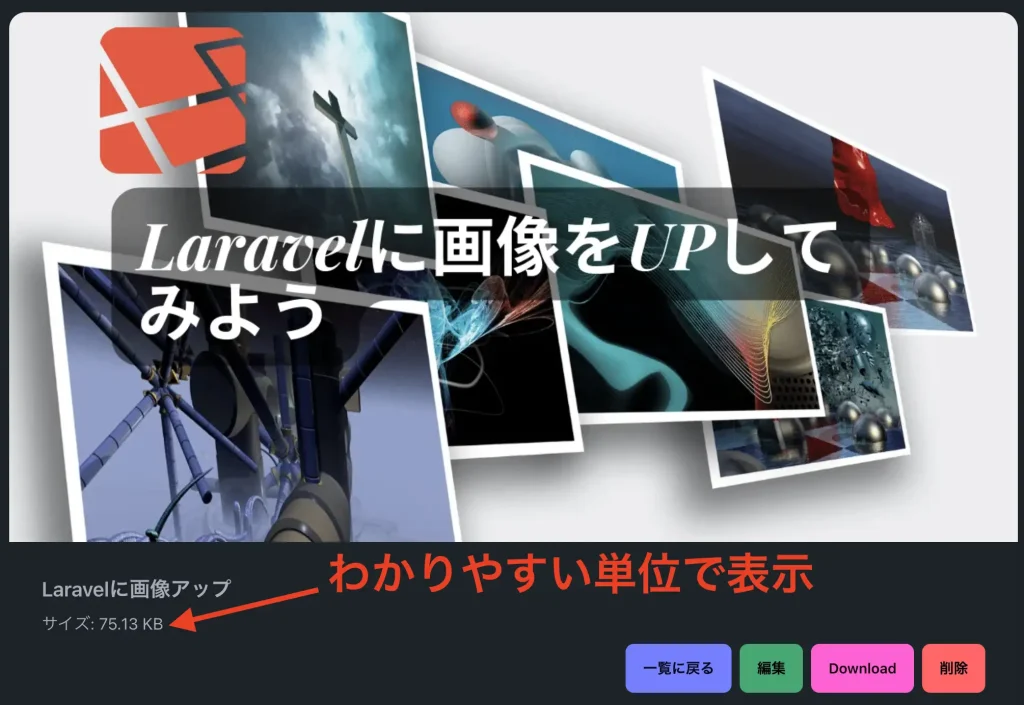
画像の詳細ページに、画像サイズも表示したいと思ったので、画像のサイズを $image->size (バイト単位)からよりわかりやすい単位(例えばKBやMB)に変更して表示しようと思います。そのためには、バイトを適切な単位に変換するカスタムヘルパー関数を作成し、それをビューで使用します。
ヘルパーファイルの作成
app/Helpers ディレクトリを作成し(存在しない場合)、その中に helpers.phpという名前のファイルを作成します。
mkdir -p app/Helpers
sudo vim app/Helspers/helpers.php
下記の様な、formatBytes()関数を作成します。
<?php

if (!function_exists('formatBytes')) {
    function formatBytes($bytes, $precision = 2) {
        $units = ['B', 'KB', 'MB', 'GB', 'TB', 'PB'];
        $bytes = max($bytes, 0);
        $pow = floor(($bytes ? log($bytes) : 0) / log(1024));
        $pow = min($pow, count($units) - 1);
        $bytes /= pow(1024, $pow);

        return round($bytes, $precision) . ' ' . $units[$pow];
    }
}
ここで、function_exists チェックを使用して、同じ関数が既に定義されていないかを確認します。これは、関数の重複定義を避けるための一般的な方法です。
パーミッションエラーにならないように下記の様に設定します。
sudo chown www-data:www-data -R app/Helpers
sudo chmod 775 -R app/Helpers
Composer.jsonにファイルをオートロードに追加
composer.json ファイルに files オートロードオプションを追加します。
"autoload": {
    "psr-4": {
        "App\\": "app/"
    },
    "files": [
        "app/Helpers/helpers.php"
    ]
}
Composerのオートロードを更新
以下のコマンドを実行して、Composerのオートロード設定を更新します。
composer dump-autoloadカスタムヘルパー関数の使用
これで、カスタムヘルパー関数のformatBytes()はどこでも使えるようになりました。
試しに、views/images/show.blade.phpの中で使用してみたいと思います。
@extends('layouts.base')

@section('title', '画像詳細')

@section('content')
    <div class="container mx-auto p-4">
        <div class="card card-bordered">
            <figure>
                <img src="{{ asset($image->path) }}" alt="{{ $image->name }}" class="rounded-t-lg">
            </figure>
            <div class="card-body">
                <h2 class="card-title">{{ $image->name }}</h2>
                <p>サイズ: {{ formatBytes($image->size) }}</p> <!-- ここにサイズを表示 -->
                <!-- ここにその他の画像詳細情報を表示 -->
                <div class="justify-end card-actions">
                    <a href="{{ route('images.index') }}" class="btn btn-primary">一覧に戻る</a>
                    <a href="{{ route('images.edit', $image->id) }}" class="btn btn-success">編集</a>
                    <a href="{{ route('images.download', $image->uuid) }}" class="btn btn-secondary">Download</a>
                    <form action="{{ route('images.destroy', $image->id) }}" method="POST" onsubmit="return confirm('本当に削除しますか?');">
                        @csrf
                        @method('DELETE')
                        <button type="submit" class="btn btn-error">削除</button>
                    </form>
                </div>
            </div>
        </div>
    </div>
@endsection
下記の様にわかりやすい単位で表示できました。
今回は、画像をアップロードして、一覧表示、詳細表示、タイトル名編集、ダウンロード、削除の出来る画像管理アプリを作成しました。
これに、JetStreamのTeam機能で、Team内だけの閲覧や、共有、投稿者情報、コメント機能等を追加すれば、本格的なアプリとして使えると思いますので、よろしければ工夫して作成してみてください。


コメント